


In part 1 of this How to Read a Fishfinder series, we talked about the traditional (CHIRP) function of modern-day units and, of course, our recommendations as to how to use that particular screen.
In this part 2, we are moving on to the side-scanning screens that show the angler a plethora of information, in an extremely large area. In our opinion, this is the best screen mode to be in when looking for structure and cover.
Your Vantage Point
First off, the side finding (SideVu on Garmin units) screen on your fishfinder is very different from other screens like traditional, down and Panoptix, down & forward, and Panoptix LiveScope down & forward. As you know, on a traditional screen, the viewer is looking at an image from essentially below the water, almost like you were scuba diving. In photography, this would be in a landscape mode.
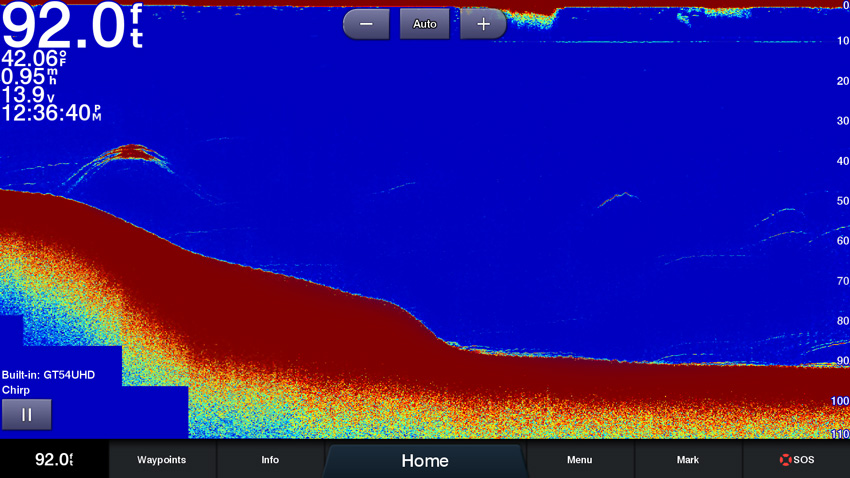
The landscape perspective of the traditional, down and forward screens
When viewing a side scanning screen, you are viewing things from a top-down vantage. This, in photography terms, equates to an aerial view.
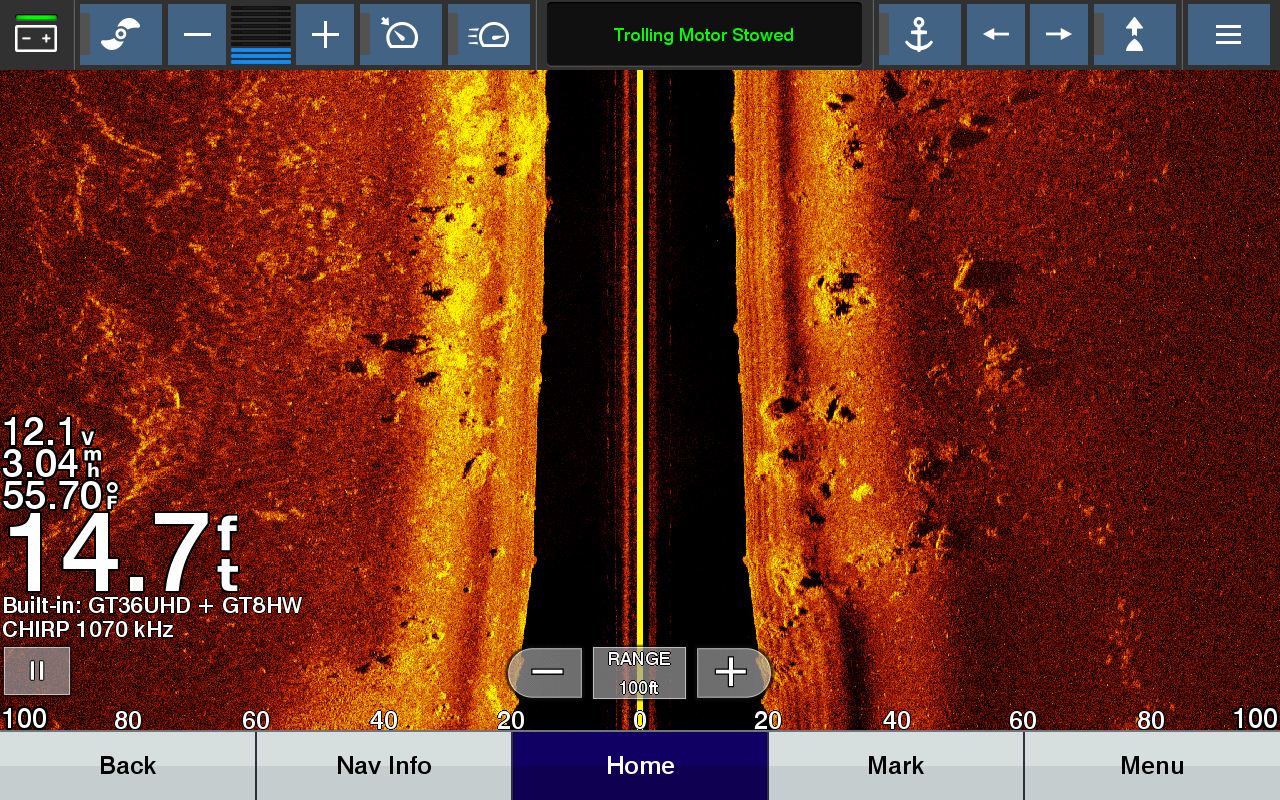
The aerial perspective (from above the scene) of SideVu
What Is Side Scanning?
Garmin Says:
- SideVü with CHIRP technology provides a highly detailed, high-resolution image of structure and fish off to either side of your boat. It’s excellent for scouting, finding fish and the right structures for successful fishing.
- ULTRA HIGH-DEFINITION SIDEVÜ: See everything the first time with stunningly clear images of structure and fish off to the sides of your boat. SideVü sonar now has 20% greater range at 1,000 kHz, so you can see even farther than before.
When Garmin first introduced their Ultra High Definition technology, anglers took note. People were lining up to get the latest and greatest. Those who had earlier models quickly shelled out the cash for an upgrade to get the best picture that their money could buy. Garmin did not disappoint.
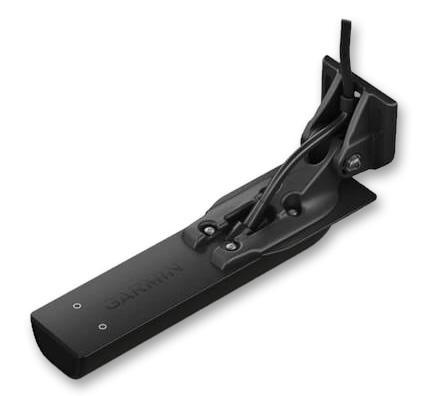
The SideVu Transducer
Side scanning transducers are shaped much differently than other transducers. They are usually long and skinny. They also must be mounted externally to function properly (a traditional signal can shoot through fibreglass so that transducer, if desired, can be mounted inside, on the bottom of a glass boat).
Our favourite side viewing transducer from Garmin is a modern-day marvel called a GT56 (or the GT36). For you techy people, here are some stats:
| FREQUENCY | Traditional High-wide CHIRP (150-240 kHz); ClearVü/SideVü 455 kHz (425-485 kHz), 800 kHz (790-850 kHz), 1000 kHz (940-1100) |
| POWER | Traditional 350 W; ClearVü/SideVü 500 W |
| BEAMWIDTH | Traditional CHIRP: 24-16; ClearVü 0.52 x 52 @ 1000 kHz, 0.64 x 35 @ 800 kHz, 1.1 x 52 @ 455 kHz; SideVü 0.52 x 52 @ 1000 kHz, 0.64 x 35 @ 800 kHz, 1.1 x 52 @ 455 kHz |
| MAXIMUM DEPTH | Traditional: 800 ft freshwater; ClearVü: 400 ft; SideVü: 500 ft |
| DEPTH/SPEED/TEMPERATURE | Depth and temperature (speed is read in the GPS) |
| NUMBER OF PINS | 12 |
| CABLE LENGTH | 25 ft |
| SUPPORTED DEADRISE/TRANSOM ANGLES | 0°-70° degree transom (GT56UHD-TM)Up to 5° deadrise thru-hull (GT56UHD-TH)Up to 25° deadrise thru-hull pair (GT56UHD-THP) |
If any or all of the above is confusing to you (yes we agree), then just trust us, the GT56 is a beast of a transducer!
Mounting The Transducer
As we stated above, the side viewing transducer must be mounted outside of the boat (vs. through the hull). Here are some ideas:
Off Of The Transom –
You can do this one of two ways, either by drilling holes directly in your transom or by adding a transom “block” made of something like polyethylene. You can either glue this block to your transom or screw it in. We haven’t found a glue that we can trust in this situation, especially on aluminum, so we opt for screwing the plate into the transom, siliconing all screws, holes and edges, and then screwing the transducer(s) into the block. Match the block colour to your boat’s colour, and it looks very professional.

Stern Saver plates can be mounted (glued or screwed) to the transom of your boat. Transducers can then be affixed via screws without adding additional holes to your rig.
The “Step” At The Stern –
Many fibreglass bass boat’s rear ends are set up in a series of “steps” or “set-backs”. In order to get the transducer constantly in the water and in an area of clean flow, the lowest step (with ample mounting room) is a good location option.
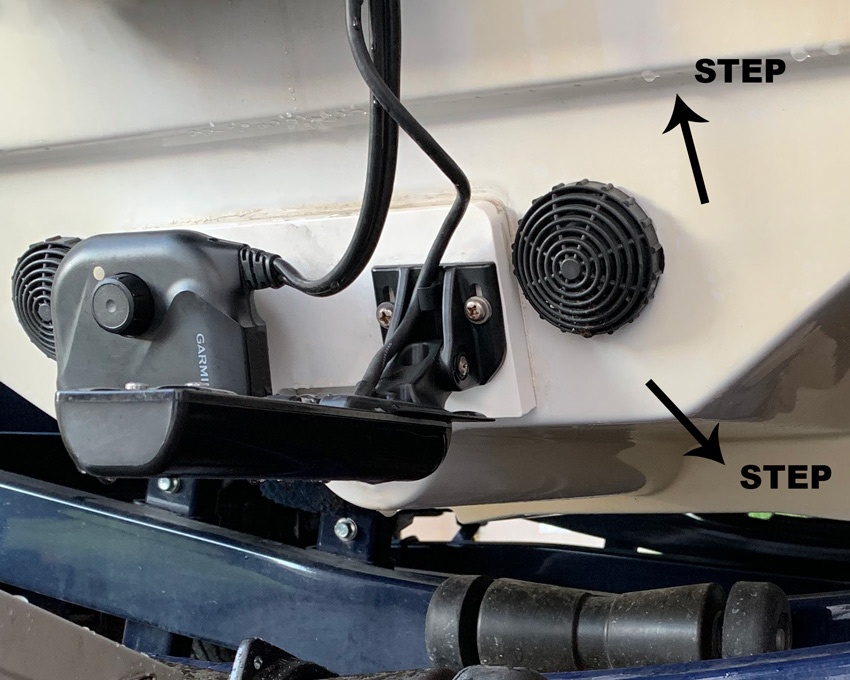
This step was used here because the “lowest” step doesn’t have ample room for proper mounting
The Jackplate –
If your boat has a jackplate, this is often a great option for mounting a side viewing transducer. If you decide on an area in the side of your jackplate, then just make sure it is as low as possible. Some anglers mount under the jackplate. Seek advice if you are unsure or have a professional install for you.
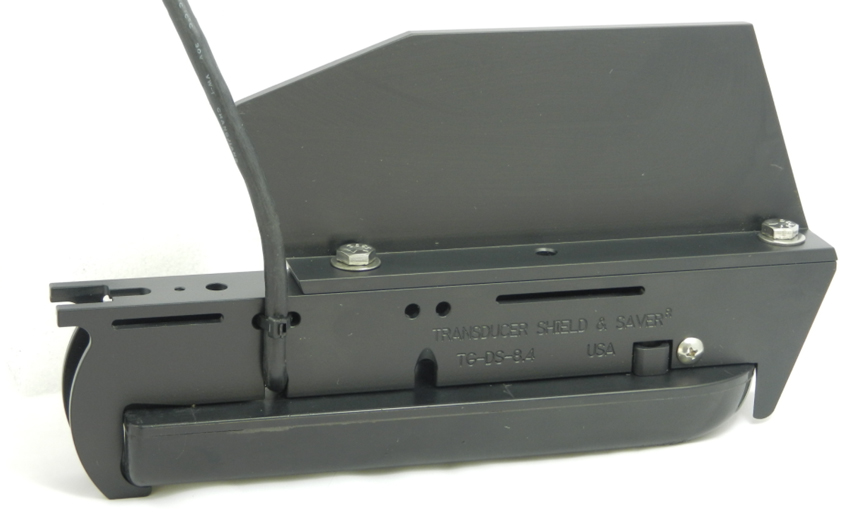
A Transducer Shield adapter bracket allows mounting a transducer to a jack plate. Drilling and mounting with hardware is normally required.
Trolling Motor –
A common area for a side viewing transducer is under the trolling motor. Many bow-mounted electric motors now come standard with some kind of transducer. In the case of the Garmin Force electric, there’s a great high definition transducer already installed. All you have to do is plug in a bow-mounted graph and you’re on your way. Remember though, as the motor turns, so will your side viewing signal.
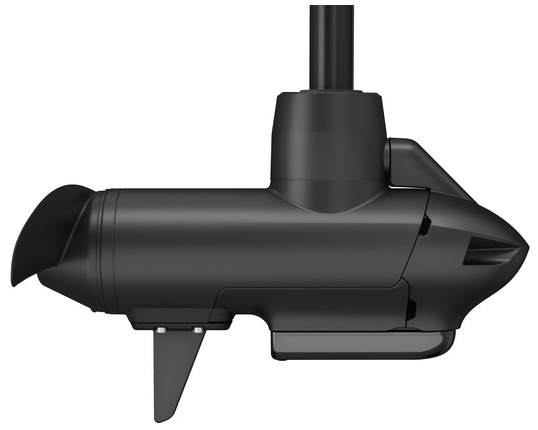
The built-in transducer on the Garmin Force trolling motor
How Side Scanning Works
Here is a great explanation from the C.H. Smith Marine website:
Side Imaging works by pulsing sonars in a fan or cone shape over a wide angle, perpendicular to the path of the transducer. The returns from these Sonar beams are collected in small slices and the slices pieced together to form a complete image. Side Imaging transducers usually operate between 100kHz and 500kHz.
Fishfinders utilizing side imaging technology can usually scan an area about 150m wide (75m to each side of the boat) and to a depth of about 45m at 455kHz. The side-angle beams are often set at either 455kHz or 800kHz providing a wider in-depth scan area or better image Resolution respectively.
Boat Speed/ Direction/ Orientation: The optimum Boat speed for side imaging is between 2 to 6 knots; too fast and data from some of the image slices will be missed. For optimal results, the Boat should be moving in a straight Line, as a turning Boat causes the Sonar pulse returns to overlap resulting in image distortion. Also, side-to-side rocking of the Boat (ie waves) can cause image distortion. If you use side imaging in wavy conditions then point the Boat into the waves instead of running parallel to them to avoid side to side motion of the Boat.
“Is SideVu Difficult To Interpret?“
What a great question. New users to any screen, let alone the side screen, will have difficulty seeing “everything”. This takes time and patience.
Seeing large objects like boulders, rocks, logs, and trees are quite easy to interpret, especially with Garmin’s Ultra High Definition technology. They show up sharp and clear, and with a bit of studying, they are easy to figure out.
Weeds, however, can be both easy and hard to figure out. Heavy-duty, thick weedbeds and solid clumps of weeds are easy to see. Low-growing, sparse weeds (like small sandgrass clumps) on a flat are much harder.
Weed clumps like the left side of this screenshot, and thick weed beds on the right, are easy to see.
Finding Fish using Side Scan
And finally, seeing fish on a side screen. This one is an art in itself. Those that are good at this are geniuses in our books. Sometimes fish are easy to see, however, many times, it takes a keen and trained eye.
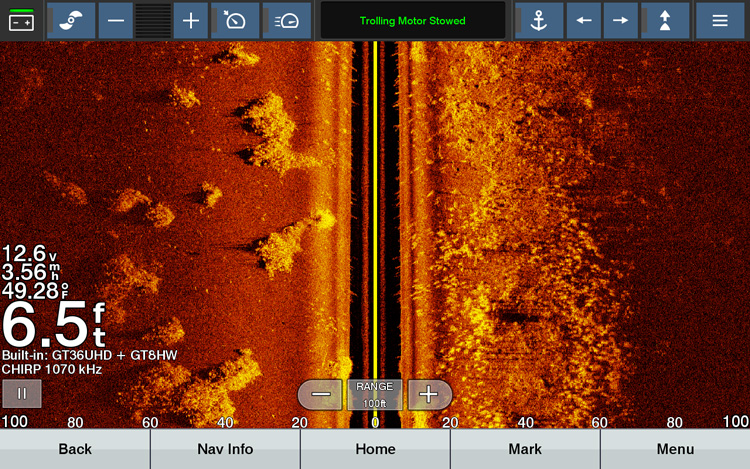
Not a lot to look at here, HOWEVER, that bright line with the dark line off to the right side is a Muskie suspended off of the bottom.
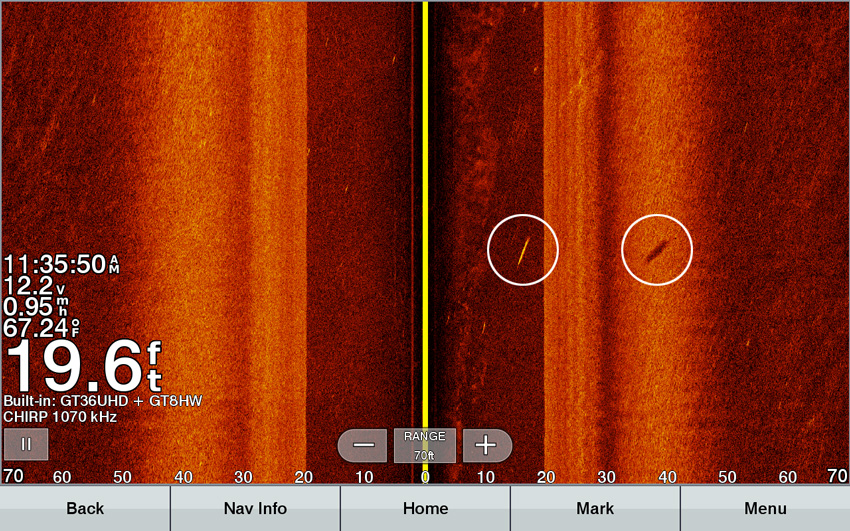
The left circle is the Muskie, the right is the Muskie’s shadow. The distance between them shows that the fish is suspended well off of the bottom.
Big fish are quite easy to see, quite simply because they are more prominent in the image. Small fish, however, aren’t so easy to spot. Luckily, panfish often hang in schools, so 20 – 100 plus “little” fish are now much easier to see.
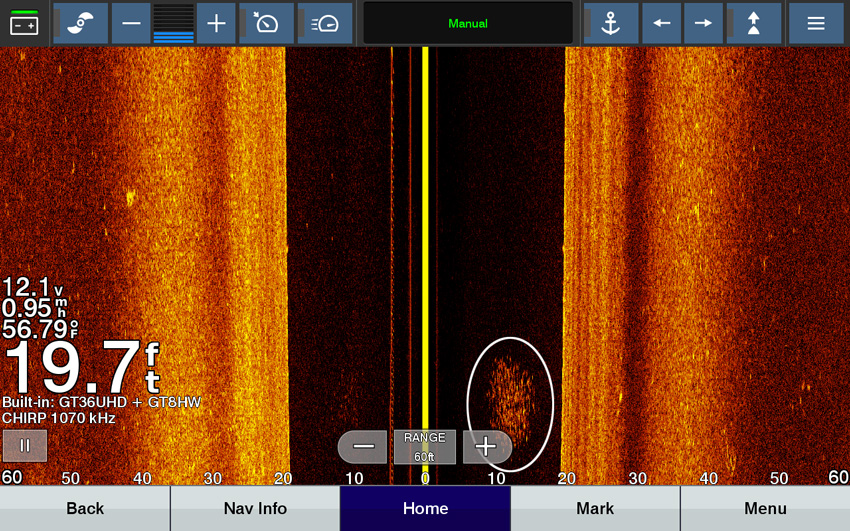
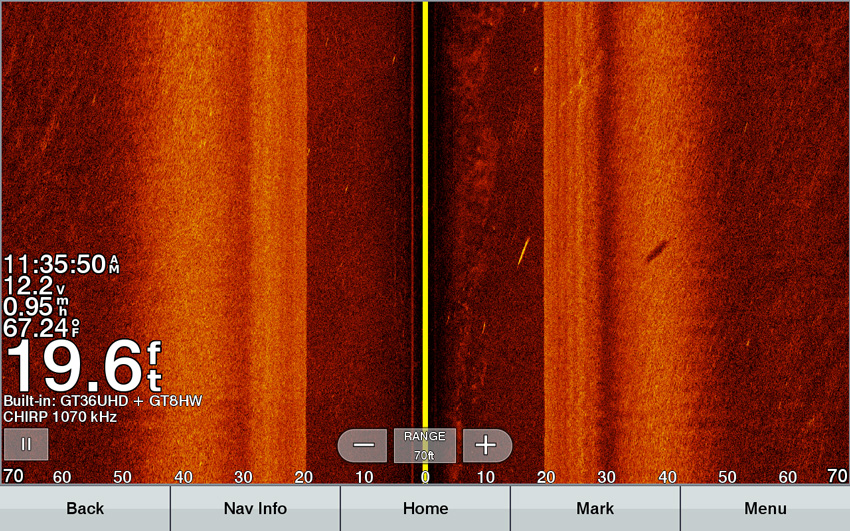
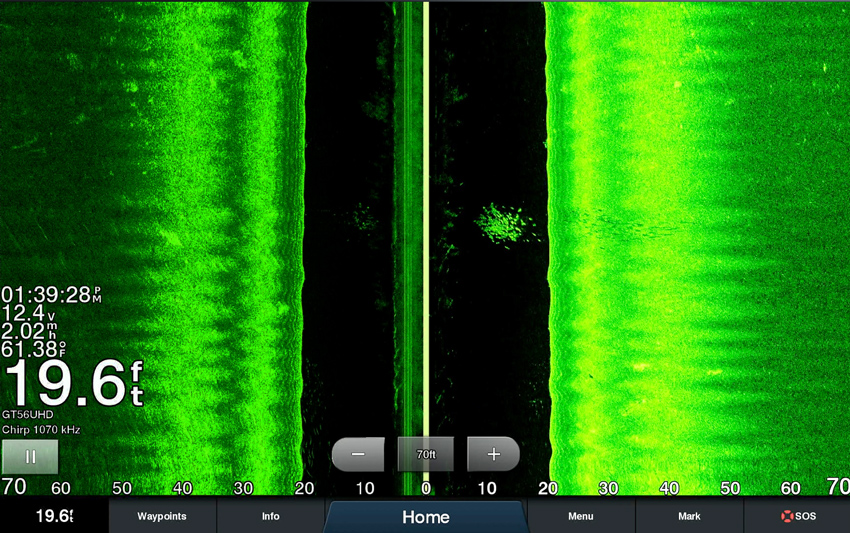
When a school of panfish like these Crappies are directly under the boat (the black strip which is from the transducer to the bottom) they are easy to spot.
When a school of panfish like this school of Crappie are over the coloured areas, they become much harder to see.
How To Take Advantage Of Side Scanning
To bring things into their simplest form, we find the most efficient and effective way of using our side view is to simply scrutinize the screen and once something different (structure, cover, fish, bait, etc) is found, we pause our SideVu screen, put the cross-hairs (the two intersecting lines) on our new-found object, and then drop a waypoint into the unit. We can then turn to our GPS screen, go back to that waypoint (which may have been 20 feet back and 100 feet out to the side by the time the waypoint is set), put on whichever fish-finding screen we want to fish with, and drop a line. This may sound confusing but honestly, it’s simple.
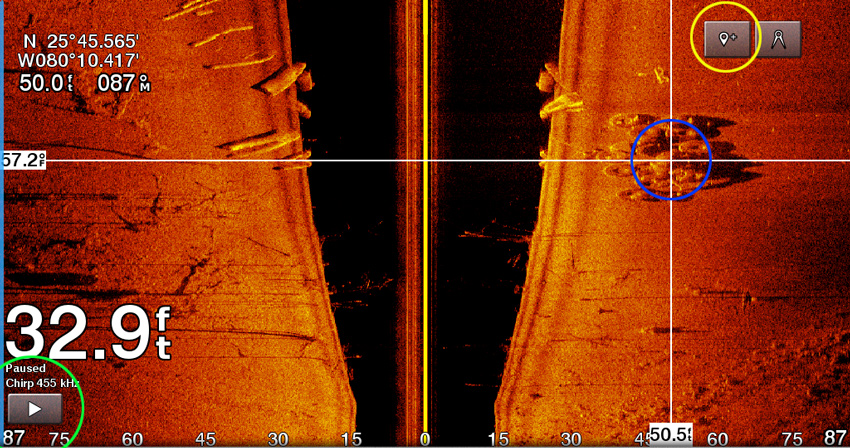
Step 1, green circle, hit pause. Step 2, blue circle, drag or cursor crosshairs to the intended target. Step 3, yellow circle, hit “create waypoint”. Step 4, green circle, hit play to resume side scanning.
If you go to the 8:15 mark of this video, you’ll see firsthand how Angelo Viola ties into a gorgeous Walleye that he and Pete Bowman found on their SideVu and Traditional screens. This was at the time when Garmin newly introduced their high definition to sonars (now Ultra High Definition). Pete saw something on the side screen, they “guessed” it was a fish, Ang cast out, the fish bit, and low & behold, they were right! Technology paid off.
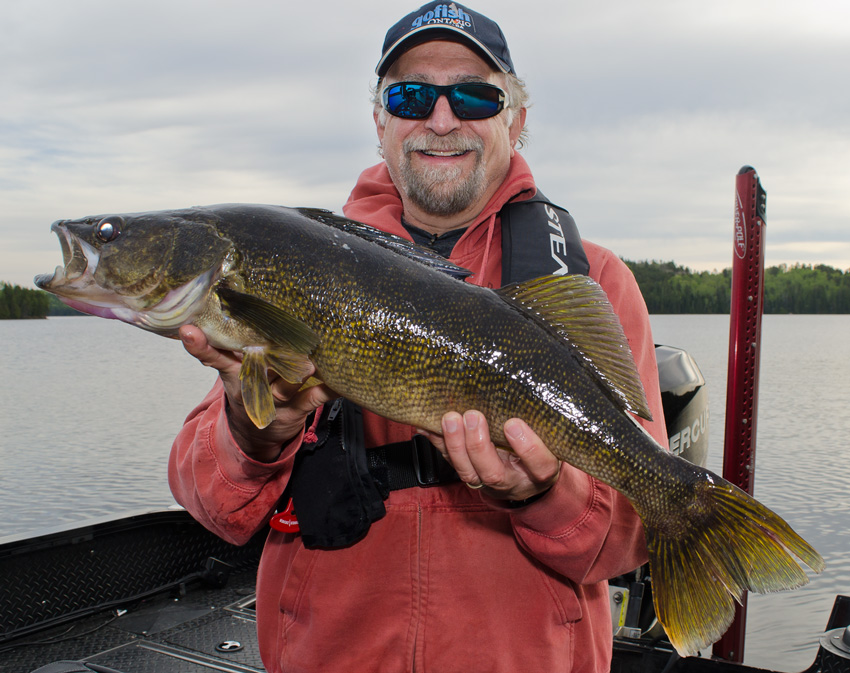
Angelo Viola proudly holds up a 27-28” Walleye that he attributes to side-finding fishfinder technology.
Other Images
Interpreting a SideVu screen simply takes time. During this time you will see oddities that you will ultimately scratch your head at.
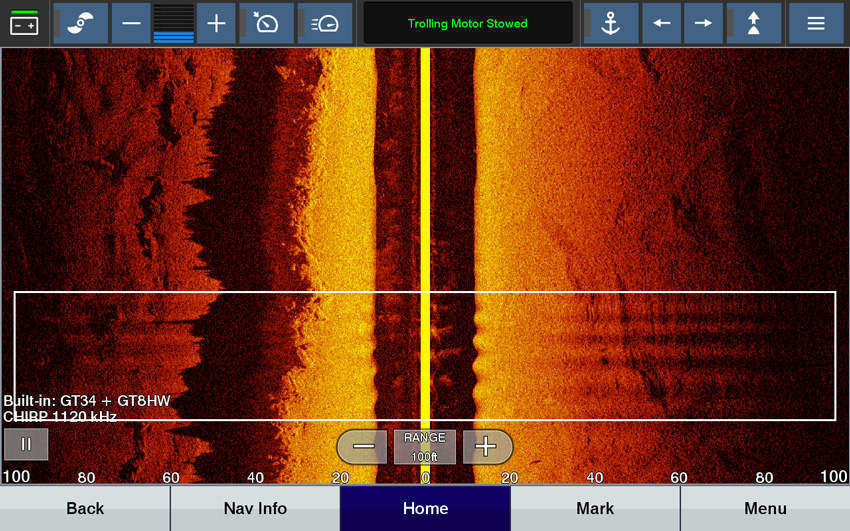
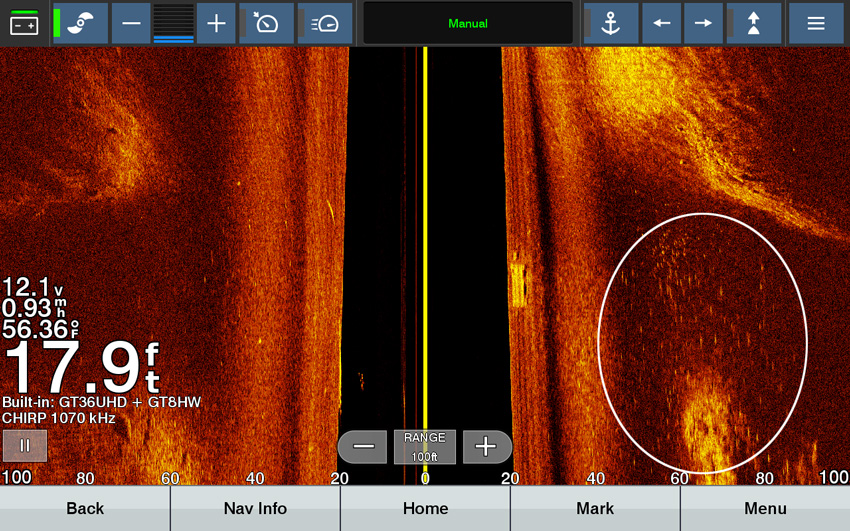
If you see marks like these highlighted by the white rectangle, no need to worry. This is the effect of the boat moving up and down and side to side from waves. In a perfect world, the best images always come in calm, flat water.
If you come across an image like the above in which one side is much darker than the other (left darker than right; should be equal) and it is hard to distinguish smaller features (like fish), try trimming up your outboard. Your lower unit of the motor could be slightly impeding your signal. Oftentimes the darker side will lighten up.
Conclusion
Trust us, Pete and Ang didn’t just hop in the boat, turn on the units, and instantly recognize everything on the different screens.
“In the SideVu mode for instance,” says Ang “it took us lots of time to figure out what we were seeing.”
Pete finishes with, “AND… we are still learning!”
Hopefully, this gave you some insight as to side-viewing and as well, will help you interpret your side-screens during your next fishing trip. Stay with it and keep scrutinizing, it’s worth it in the long run.
15 Responses
So that’s how they work!
Hey Rick, keep with us brother, there’s more to come
Thanks. Very informative.
Hi Hogger, you’re very welcome. These are fun to put together and we learn lots just reviewing our own screen shots… win-win!
Well explained, (I think), let you know when I start using mine.
wow sounds complicated for a rookie. never used electronics when fishing
Yes it can be complicated BUT remember, the more you use electronics, the better you’ll get. TIP: do the reverse… when you catch a fish, then look at the different screens to see what’s happening. You may not see other fish but you can certainly see the surroundings they were in.
Sorry for the delay BTW!!!!
Hi Pete, These Blogs are really dynamite. Learning how to read sonars or using different instruments to types of bait with these above illustrations are far more productive than an hour long blog.. I think most fishermen are visual. I don’t miss any of your blogs so please keep them coming..
Cheers, stay safe and stay well..
Hey Tuggr, thanks for the comment, much appreciated!
Thanks Pete. Very interesting Fish Finder concepts and idealisms when dealing with the acronym SONAR. The transducer bio is also quite revealing.
Awesome stuff, Many thanks.
nd_user – Nice Article! How to Read a Fishfinder – Side Scanning Sonar (Part 2)
Admin – Nice Article! How to Read a Fishfinder – Side Scanning Sonar (Part 2)
Moderator – Nice Article! How to Read a Fishfinder – Side Scanning Sonar (Part 2)