


Sponsored by Garmin
Over the last couple of months, we here at Fish’n Canada have been walking you through all-things sonar in an attempt to simplify this new technology and help you make the most of it when out on the water. Though many of these guides and tutorials have been focused on finding fish in open water, the utility of fishfinder does not cease when the lakes freeze over and those who know how to use their technology can find it especially useful during the ice fishing season.
Here is everything you need to know about using your Garmin fishfinder during ice fishing season.
Finding Fish
Since most of you are here because you want to find fish, we figured we’d start our guide off with the most basic, yet important, question: “What does a fish look like on an ice fishing sonar?”
Review: How Chirp Works
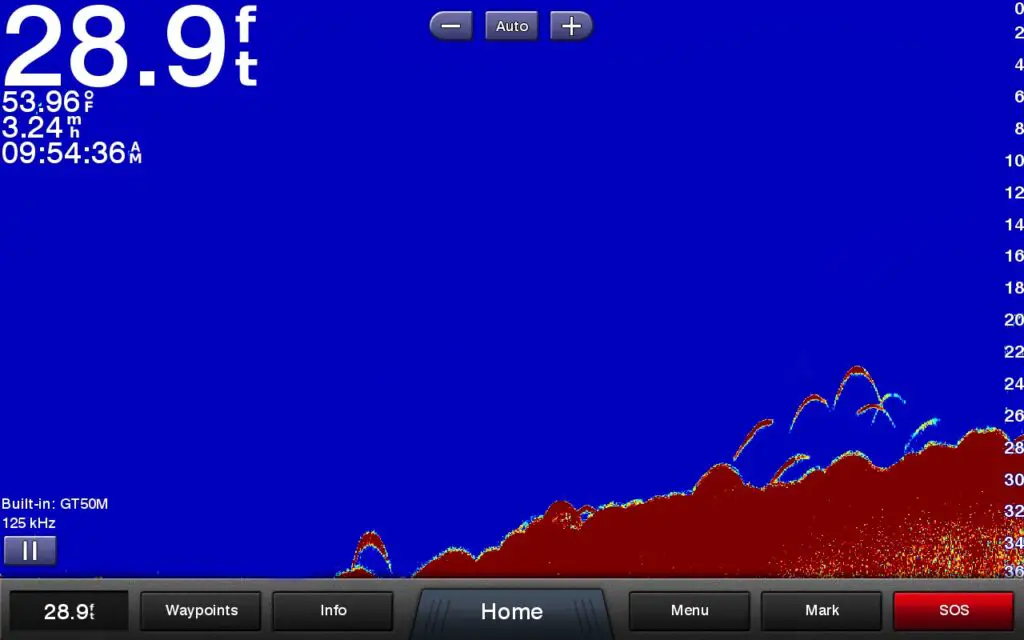
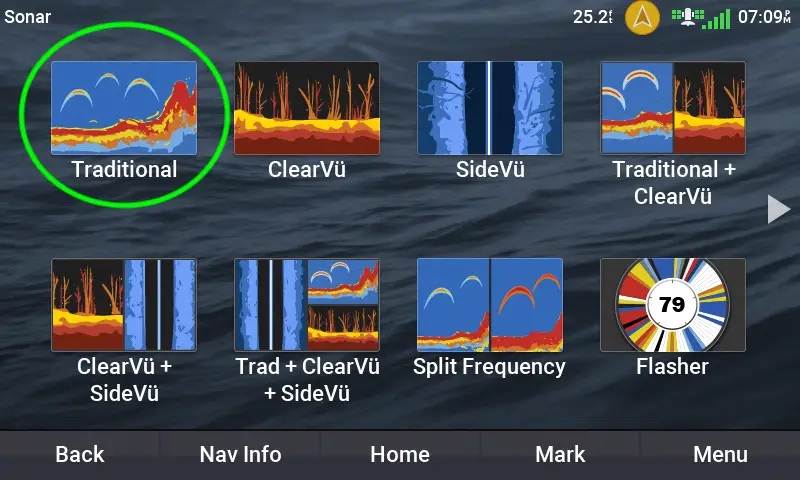
CHIRP (aka. Traditional View) is likely the mode that many of you are familiar with and is what you will spend the majority of the ice fishing season looking at. We highlighted this technology in great detail in Part One of our “How To Read A Fishfinder” series, but here is a quick breakdown of how CHIRP works.
As Angelo mentioned in the Tools of the Trade video above, fishfinders work by transmitting a signal down through the water, via a transducer, and when that signal hits an object that has more density than the surrounding water (like a fish, fallen tree, weed bed, and, of course, bottom), it bounces back, gets processed, and is displayed as an image on the unit’s screen.
When ice fishing, this process is entirely the same, however, things are going to look slightly different due to one small factor – your transducer is now stationary.
What Fish Look Like on an Ice Fishing Sonar
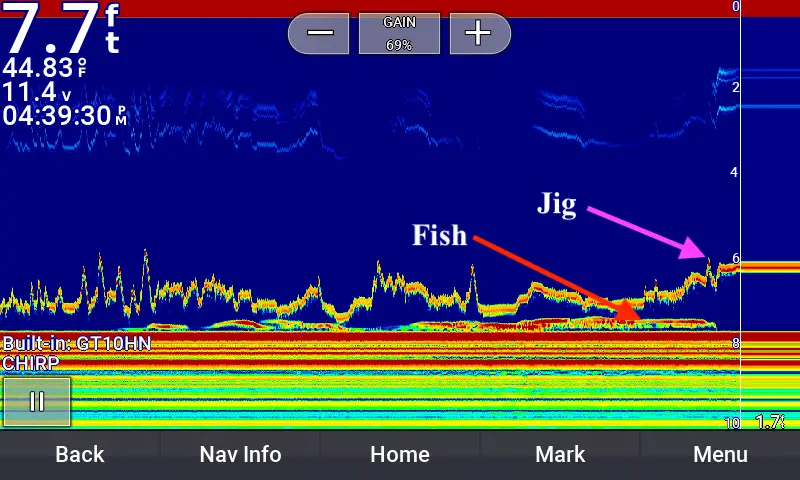
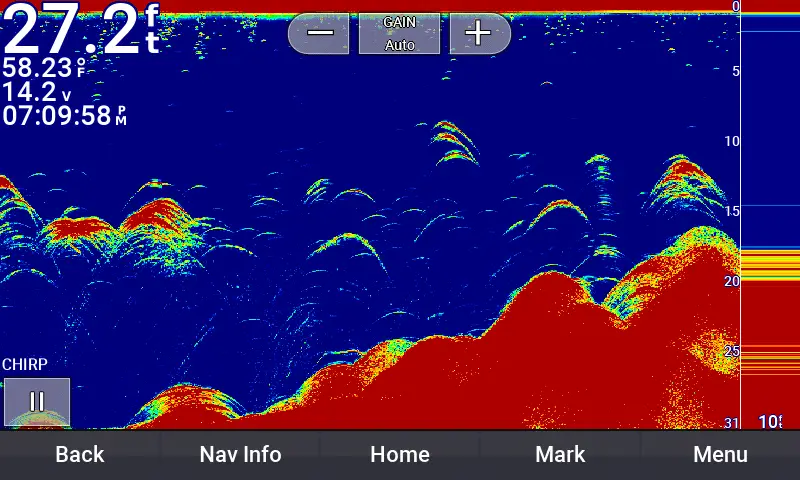
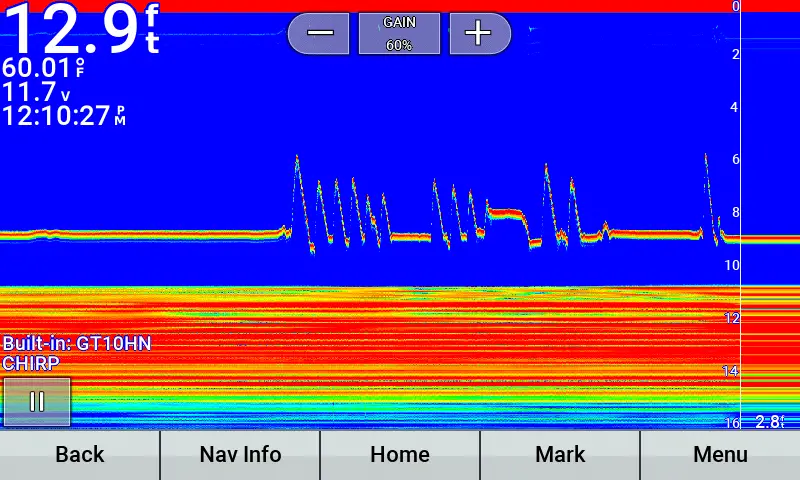
As we mentioned in Part One, the classic “hook” shape that represents fish is due to boat movement, creating a thin line when the fish first enters the cone of the transducer, a thick bar when the boat is directly on top of the fish, followed by another thin section when the fish is leaving the cone.
While this shape is still possible if a fish was to quickly swim beneath your feet, the much more likely scenario is going to be a long thick bar across your screen when the fish approaches, eventually followed by a thin line if it decides to leave. This scenario can be seen in the screenshot above, where a fish (bottom line) approaches Angelo’s jig (constant line) from below before (unfortunately) turning away to leave.
Determining Fish Size
Since we are now stationary, the length of the line is no longer relevant to the size of the fish and now solely represents how long the fish spent under your transducer. For this reason, line thickness is, once again, the primary factor for determining how large a fish is, as the thicker the mark, the larger the object the transducer had to pass through before reaching the other side.
As you can see in the screenshot above, the fish that briefly appeared is roughly the same size as the jig. In shallow water like this, a large fish would read significantly larger than the jig and would likely appear as a thick bar across the bottom.
Seeing Fish in Real-Time
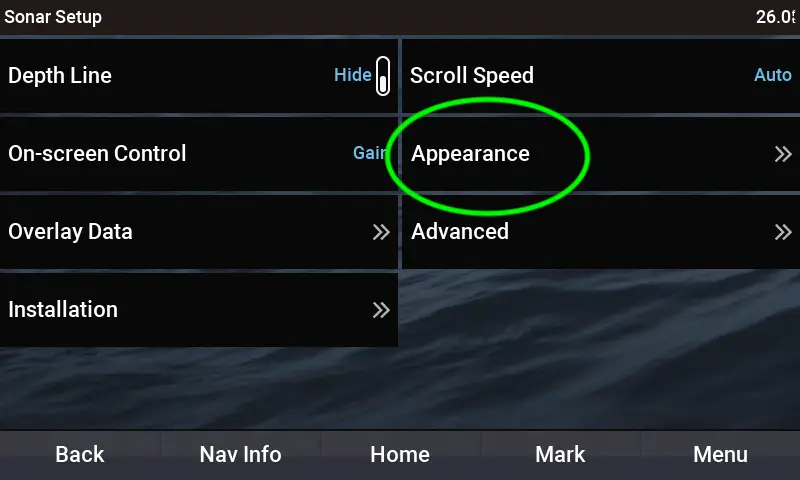
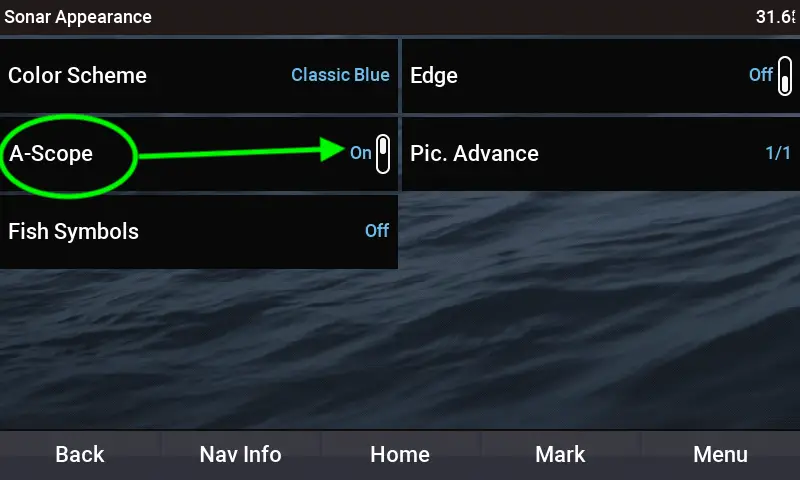
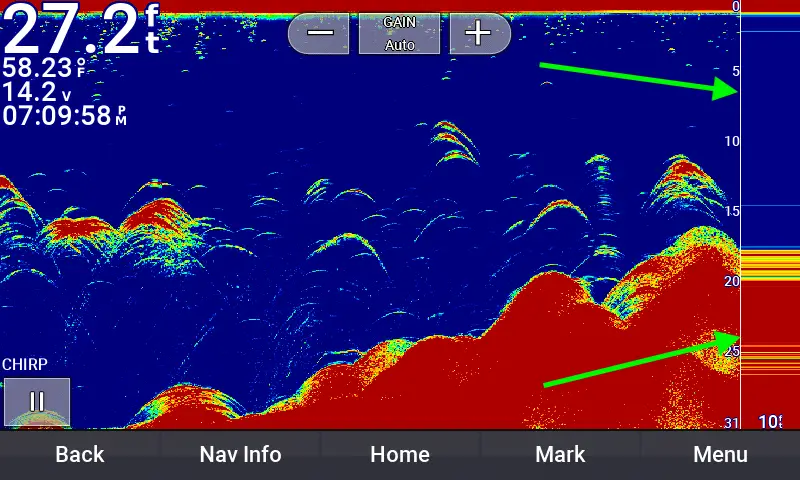
A-Scope
With movement being limited and fish being a bit slower than they are during other times of the year, seeing and reacting to fish in real-time is essential to capitalizing on every bite.
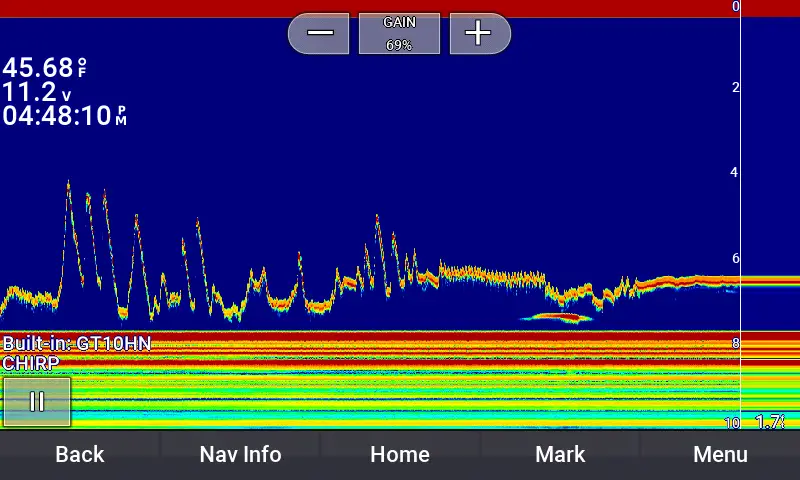
In the past, this is why anglers would favour flashers, as the units are designed to show, in real-time, what is going on underneath your feet. Modern Garmin units actually do have a “flasher” screen for those who prefer that style, however, real-time is also perfectly attainable using Traditional CHIRP and a feature known as A-Scope.
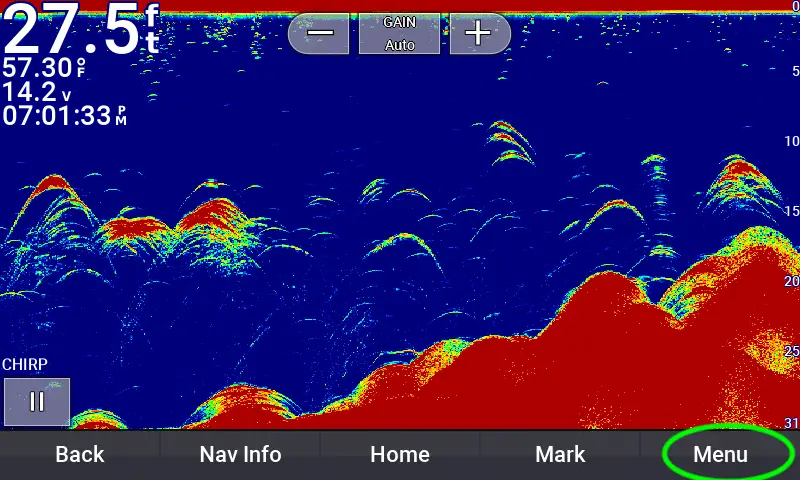
A-Scope comes standard on all Garmin ice units and will show you everything that happens under your transducer precisely as it happens. As you can see in the screenshot above, this is achieved by displaying a small bar on the right side of the screen. This bar is essentially your “live” view of what is going on underneath you, with everything behind it giving you a replay of what just occurred.
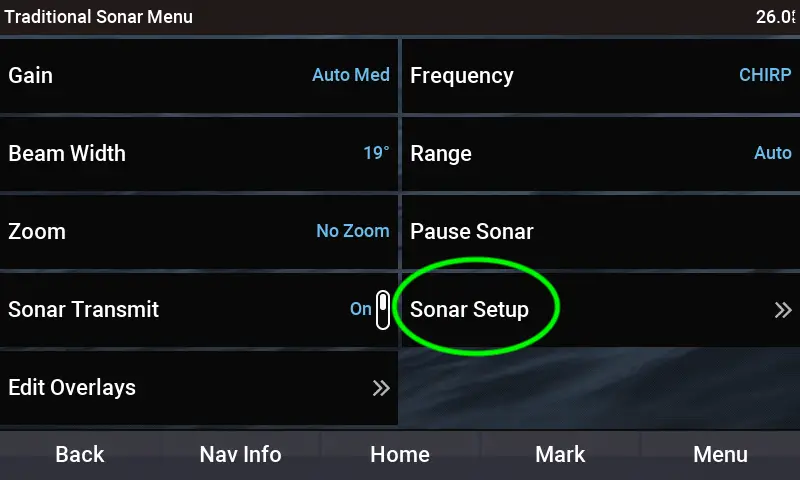
Here is how you activate it on your unit:
How to Activate A-Scope
Fishing with A-Scope
With A-Scope active, it is now time to determine how you are going to fish with it.
The best way to start is by locating your bait. This can be done by jigging in a distinct motion that you will be able to differentiate from whatever else is moving on the screen. Once you find yourself, it will look as though you’re drawing on the screen, with your jig moving up and down and every movement you make showing on the still-screen behind you.
Once you are located, the video game-style fishing that this technology allows for can commence and you can now watch, in real-time, as fish approach your bait. This is something that Pete Bowman takes full advantage of during the hardwater Lake Trout season.
“A-Scope is essential for hardwater Lake Trout as that half-second delay on traditional CHIRP is often enough to miss an opportunity at a hesitant fish. Using A-Scope allows me to get my bait to the fish as soon as he is in view and play that cat-and-mouse game that is so essential to getting Lakers to take this time of year”
Pete
LiveScope
For those looking for a true real-time view, Livescope is what you’re after. This new technology is virtually the same as having a camera on the fish below, with detail so strong that a learned angler can even distinguish between the species of fish that approach his bait.
For those looking to get their hands on one of these innovative units, Fish’n Canada is currently running a contest and will be giving away TWO free units throughout the winter. Click the link below for more details on how you can enter:
Transducers and Transducer Placement
Traditional
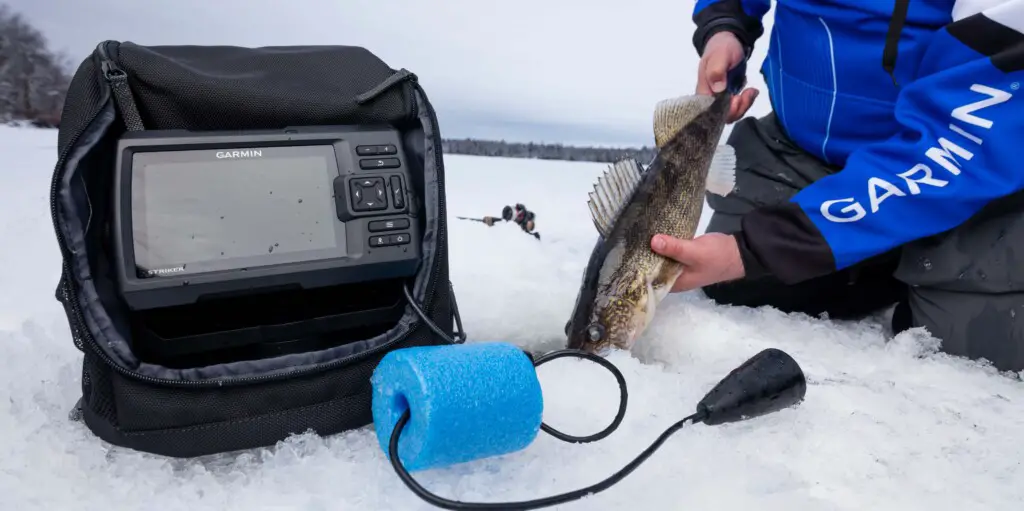
Traditional transducers are what many of you are likely accustomed to seeing when ice fishing. As seen in the photo above, these transducers often consist of a heavy, anchor-like transducer, a long wire connecting to your fishfinder, and a piece of foam/pool noodle that keeps it at the desired depth.
Although the depth at which the transducer is set is rarely a topic of discussion, it is something we get asked about a fair bit. Here are Pete’s thoughts on the matter:
“How far down should I set my transducer?”:
I always try to set my transducer just under the ice. Keep in mind that the narrowest point of your transducer’s cone is the top. This is why it is almost impossible to see your jig when it comes within a few feet of your transducer. Keeping this “blind spot” as high in the column as possible is always a good idea, especially when fishing for suspended or cat-and-mouse style fish like Rainbows or Brook Trout.
“Do I need a separate hole for my ice fishing transducer”:
Another placement question we often get asked is how many holes you need to drill when using a fishfinder through the ice.
For a standard unit, fishing in the same hole as your transducer is perfectly acceptable and can save you a lot of gas, or muscle, when hole hopping. However, when I’m using my LiveScope unit, a second hole is an absolute necessity.
The LiveScope transducer mount (a “pole” setup held in a bracket) pretty much covers up an ice hole. As well, the way the Panoptix LVS32 transducer is attached to that pole takes up a bit of room in and under the hole. To try and drop a line down that LiveScope hole could turn into a disaster. You are much better off drilling another hole directly beside your fishfinder hole. If you are hole hopping or you want to “scope” some other areas, then this makes for much more work. We feel it’s effort well spent!
LiveScope

As you can see in the photo above, those fishing LiveScope units have slightly more to deal with when it comes to transducer function and placement. Here is some advice from LiveScope expert Pete Bowman:
Account for the Second Hole:
If there is something that might be a tad confusing when you first set up your double hole attack, it’s the view on your LiveScope screen in where your bait is not falling and working directly under the zero point of your LiveScope screen. That is how precise these machines are. The “0” indication is directly under the transducer sitting no more than a foot or two away from your fishing hole. Don’t fret with this one, if and when a fish enters your screen showing interest in your bait, you’ll eventually learn that the screen position means nothing when it comes to a bite.
Eliminate the Blind Spot
LiveScope works in three different modes, forward, down, and perspective. Ice anglers normally use the Down viewing mode. It’s precise, the signal is strong, and you can really dial in a nice clean screen. Remember though, if you’re an open water LiveScope user that almost always uses the forward view, once you click the position of the transducer to the down setting, your scale may change. You may have to readjust manually to get the range you desire.
As well, with the LiveScope transducer in both forward and down view, it is shooting a signal in the direction that the transducer is pointed. That “band” of signal, if you will, is not very wide so there essentially are some blind spots in where fish can approach from and you may not see them. That’s why we feel it is an absolute must to keep spinning/turning your transducer position (on the pole) to cover 360 degrees and be aware of a sneak attack by your quarry.
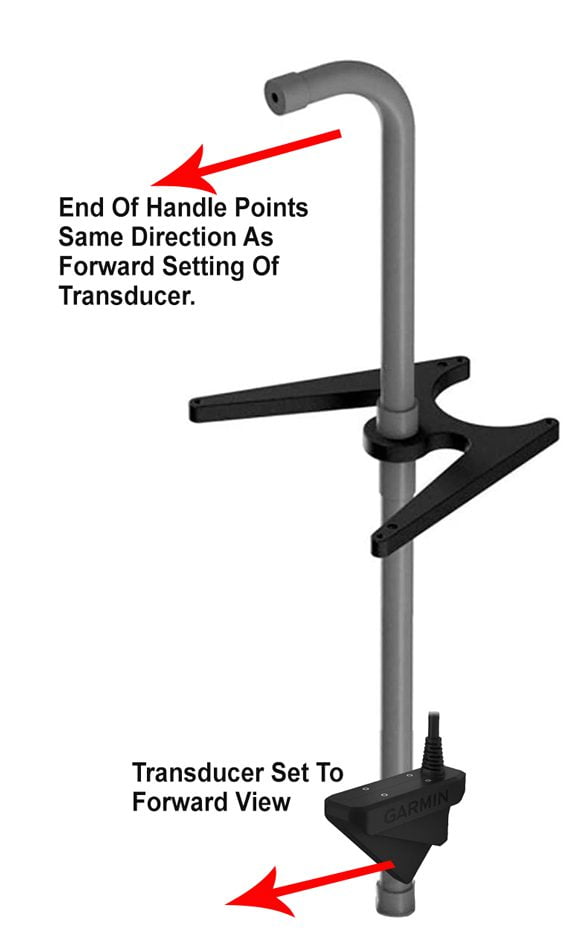
We’re not sure how everyone else sets their transducers up but we like to have the end of the 90-degree LiveScope pole handle, pointing in the “forward” direction when the transducer is set to forward. We get the fact that it might be “opposite” or even a bit awkward when compared to the opposite, but that handle tells us 100 percent the direction of the scan.
Finding the Ideal Sensitivity
Sensitivity is another topic worth discussing when looking at ice fishing sonars as it is a major source of confusion for anglers that are new to the technology.
Sensitivity, as the name suggests, refers to how sensitive your fishfinder will be to objects that swim beneath it. If sensitivity is high, for example, the transducer will pick up every minute detail in the water column, from debris to fishing line to micro jigs. When sensitivity is low, on the other hand, only very dense, obvious objects will display on the screen. Here is what Angelo Viola had to say about what is best suited for ice fishing.
“When ice fishing, it is all about finding that balance. As a rule, I like to set my sensitivity as low as I can without eliminating my ability to see my own bait.”
Ang
Angelo’s preference for low sensitivity is shared by most ice anglers, as debris caused from bottom-bouncing and interference from other fishfinders can make the screen virtually unreadable when sensitivity is set too high. There is, however, a time and a place for cranking up that dial:
Sensitivity should definitely be kept low when targeting bigger fish, but when small fish are in the area, or when I am targeting suspended fish, I like to crank it up a few notches. Smelt-chasing Lake Trout often call for this approach, as staying in line with these sometimes hard-to-see smelt schools is essential to staying in the fish’s target zone
Pete
We hope that helped clear up some of the confusion around ice fishing sonars! If you are interested in learning more about some of the options Garmin has to offer, check out our other articles at the links below:
5 Garmin Fishfinders to Have on Your Ice Fishing Radar
Why you Should be Using a Fishfinder for Ice Fishing
For the rest of our How To Read a Fishfinder Series, find parts one and two below:
