


Design by Charles Ray
Charles Ray from Idaho,USA designed this universal fishing Line Winder that costed him about $8.00 to make. Buying one in a store will cost about $19 to up to $100, This design will work with all reels and spool configurations. It Can be mounted horizontally on a table or workbench or vertically on a door or bookshelf. Here is how he made it :
Tools and Materials
MATERIALS:
- (1) 5-1/2″ x 8″ x 3/4″ plywood scrap
- (1) 1-3/8″ x 3-1/2″ x 7/8″ hardwood scrap
- (2) 1-3/4″ wood screws
- (1) 1/4-20 x 8″ machine bolt
- (2) 1/4″ I.D. shaft collars
- (2) thumbscrews to fit shaft collar set screw thread
- (2) 1/4″ I.D. x 5/8″ O.D. x 1/2″ thick nylon spacers
- (2) 3/4″ O.D. hard plastic conical faucet washers
- (1) 21/64″ x 1-1/8″ x .035″ compression spring
- (1) 1/4″ flat washer
- (1) 5/16″ flat washer
- (1) 5/16-18 wingnut
- (1) 2″ x 3″ x 5/16″ square u-bolt
- (1) 1/4″ I.D. x 1-1/2″ long rubber tubing
- (4) self-adhesive non-skid spots
TOOLS:
- Wood saw
- Hacksaw
- Flat file
- Drill motor
- 13/64″ bit or 3/16″ bit
- 1/4″ bit
- 5/16″ bit
- Appropriate countersinking bit for your wood screws
- 220 grit sandpaper
- 7/16″ box end wrench
- Wood glue
- Measuring device
- Screwdriver for wood screws
- Square
Assemble
[tabgroup][tab title=”Step 01″]

1- Cut out wooden parts. Sand smooth.
2- Drill a 13/64″ hole 1/2″ from the top of the piece of hardwood, centered on the 7/8″ side
3- Use the 7/16″ wrench to thread the machine bolt into the hole
4- Use the hacksaw to remove the bolt head and dress the cut with the file
5- Drill a 5/16″ hole in the center of the 8″ side of the base, 3/4″ in from the edge
[/tab]
[tab title=”Step 02″]

6- Attach the upright to the base using the wood glue and the two wood screws in countersunk holes. The side of the upright should be 1-1/2″ from the edge of the base.
7- Attach the 4 non-skid spots to the base. Put two at the corners of the 8″ edge nearest the upright. Put the other two 1-1/8″ from the other corners, along the 5-1/2″ edge.[/tab]
[tab title=”Step 03″]

8- Use the hacksaw to cut the U-bolt, making an L-bolt
9- Slide the rubber tubing over the short leg of the L-bolt[/tab]
[tab title=”Step 04″]

10- Remove the existing set screws from the shaft collars, and replace with the thumbscrews. The thumbscrews may need to be cut off, leaving about 1/2″ of the threaded portion.[/tab]
[tab title=”Step 05″]

11- Use the 1/4″ bit to enlarge the holes in the centers of the conical washers
12- Assemble the parts as shown, paying special attention to the orientation of the conical washers.[/tab][/tabgroup]
Usage
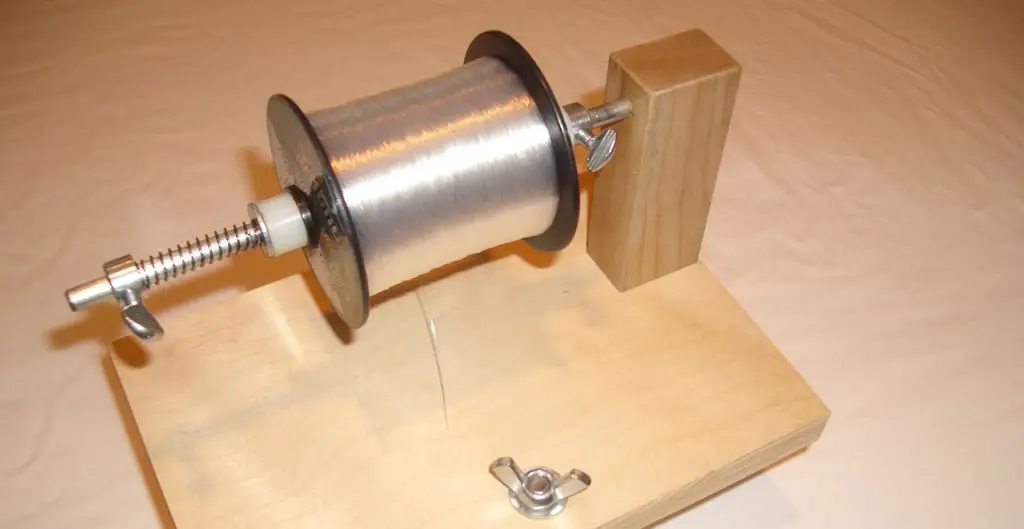
Photo One:
Baitcaster, Fly, Center Pin and Alvey-type reels (axle of reel parallel to winder shaft):
1- Clamp line winder to a convenient vertical or horizontal surface using the L-bolt.
2- Remove outer shaft collar, spring, flat washer, nylon spacer, and conical washer.
3- Install line spool with the line unwinding off of the top of the spool, towards the reel.
4- Replace the conical washer, nylon spacer, washer, spring, and collar.
5- Position the spool in the center of the shaft and tighten the inner thumbscrew.
6- Make sure that conical washers are centered in the spool.
7- Achieve the desired rotating resistance on the spool by compressing the spring, then tightening the thumbscrew on the outer shaft collar.
8- Attach line to reel and reel away.
NOTE: When filling fly reels, center pin, and Alvey-type reels, the spool of line should be mounted on the shaft with the line coming off of the bottom of the spool, rather than the top.
Photo Two:
Open-face Spinning and Spincast Reels (axes of reel and winder in-line):
1- Clamp line winder to a convenient horizontal surface using the L-bolt.
2- Remove outer shaft collar, spring, flat washer, nylon spacer, and conical washer.
3- Loosen set screw on inner shaft collar.
4- Place spool on shaft.
5- Replace conical washer, spacer, washer, and outer shaft collar. Spring not used.
6- Secure outer collar on the very end of the shaft.
7- Center the spool on the outer conical washer, slide inner assembly snug to the spool and tighten to prevent the spool from turning.
8- Attach line to the reel and reel away
[divider][/divider]
Design and Construction by Charles Ray – McCall, Idaho, USA
Photos by Andrew E. Ray – Bridger, MT. USA